
How to set ENC H.264 Encoder for YouTube Live streaming
In today’s age of fans, more and more people are using facebook, youtube and other platforms to broadcast live.Platform rules are getting tighter. If you want to live stream video and audio on facebook, you need the hardware and how to set it up. I’m going to share a tutorial on this topic, which I hope will help you.
We set the audience as the primary users and professional users:
Primary user hardware: computer, USB camera, small room, software setup tutorial: OBS Studio software, Youtube Settings
Professional user hardware: computer,h.264 encoder,professional camera, switchboard, Studioo software setup tutorial: H.264 encoder setup, Youtube setup
1.OBS Studio method for primary users to push live streaming to Youtube (the computer operating system is windwos 10)
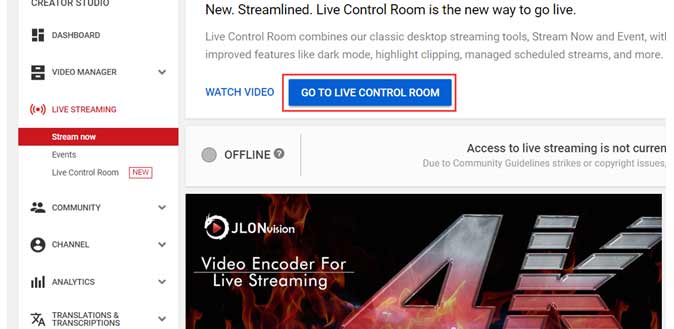
1) First, confirm that the USB camera has been connected to the computer and is in normal use. Through the Google search youtube live or directly enter https://www.youtube.com/live_dashboard looking for entry. Log on to your youtube account. From the “Stream now” page, select “GO TO LIVE CONTROL ROOM” to go to the settings page. Fill in the “New stream” with the desired title name, and the “Stream setup help” configuration page is generated. Find “Server URL” and “Persistent Stream Key”. They are followed by a copy button, click copy for use. Click “DONE” to enter the receiving state.

 2)Open the installed OBS Studio software,Click + select the source Device -Video Capture Device in the Sources window of the main software window. At this time, you will see the camera image successfully displayed, click OK, and enter the main window to manually customize and adjust the size and position of the live broadcast video. (if no image is displayed, please check whether the USB camera is working properly. Note: the audio device setting method is the same.)


3)Open the main menu “File-Settings-Video”, Set video live stream resolution “Out Resolution”(Depending on your bandwidth, the resolution below 1Mbps bitrate is generally set below 1280*720), “Common FPS Values” set 30fps. File-Settings-Audio, Audio can be set as the default parameters “Sample Rate 44.1Khz,Channels Stereo”.


4)Set video live stream output bit rate to open the main menu, “File-Settings-Output,Output Mode-Simple,Streaming”. It has 3 core Settings:Video Bitrate-500Kbps(According to the national bandwidth situation definition, the recommendation is above 500Kbps), Encoder-Software(X264),Audio Bitrate-64.

5)The last setting connects to the Youtube interface, File-Settings-Stream choose Service-Custom…, Server-Enter the Server URL for the Youtube configuration page, Stream Key-Enter the Persistent Stream Key for the Youtube configuration page, Then select the OK button on the bottom right and we are done with the core configuration.

6)Return to “Controls” in the lower right corner of the main interface, click “Start Streaming”, the youtube configuration page receives a live stream and generates a preview window. At this time, you can click the bottom right solution “GO live” button to achieve the effect you want.


2.Professional encoder pushes live streaming to Facebook platform

1)First confirm that the h.264 encoder has been connected to the signal source and is in normal use. Log in to your Youtube account. In the upper right corner of the window next to my profile picture, click on the VCR button and select “Go live.” Create a new title and open the Youtube configuration page. 1)Keep the page open, find “Server URL” and “Persistent Stream Key”. They are followed by a copy button, click copy for use.

2)ENC2 h.264 encoder hardware developed and produced independently by JLONvision is a 2 channel of 4K 30fps embedded video and audio hardware video encoder,It is also a 1 channel decoder and can be converted into a 4 channel IP transcoder. It applies H.265 and H.264 encoding standard.
We need to log into the hardware video encoder ENC2 setup page, open a browser to http://192.168.0.217 (User name: admin Default password: admin). Select main menu “Dashboard”, Check whether the signal source is normal under Preview, Then select “Encode” page from the main menu to set encoding parameters, as shown in the following figure, according to 1-encoder config,2-video size 4K(ENC2 support 4K 30fps),3-encoding format choose H.264 High Profile(Because the Youtube platform does not yet support HEVC),4-settings rate control-VBR,bitrate input 1500 Kbps, enable-on,5-save settings.

3) Switch the main menu to Stream page to set the H.264 encoder pull live video streaming,ENC2 default setting turns on all live streaming protocols, according to 1-stream, 2-check whether RTMP protocol is on, 3-open push Stream key,4-fill in address: rtmp://a.rtmp.youtube.com/live2/6xfr-zsrt-16eh-0yds(Server URL/ Stream name/key),5-save settings,6-click Play URL,7-Check it if the save working.


4)Select Options–System, 2-click Reboot, Hardware video encoder from the main menu to complete the setup (restart only takes 10S).

5) Switch to the Youtube profile page that you just opened, and you will find that you have received a preview of the Live stream. At this time, just click “Go Live” in the lower right corner of the window to publish the Live program to the public or circle of friends. (note: since the platform is strict in reviewing the program source rights version, issues related to pornography and terrorist organizations, we hope that your live program will not have these issues, otherwise Youtube will freeze this function).
Youtube live is set up in the same way as Facebook or any other platform. It only takes you a few times to understand it. Well today we will share here, hope to help you.